Thursday 30 August 2007

Anna's bathroom update

Hello everyone; apologies for not posting anything for ages, spent the last few weeks animating and sorting out render passes.
I painted some dirt for the boy's clothes and face, and added some more bump maps here and there,- hopefully my lack of lighting experience does not take away from the result.. I changed the outside wall colour from beige to red-brown since it was too similar to the boy's skin colour. I may also need to tone down the shadows and the picture frame, though it kind of gives an idea of what will follow.
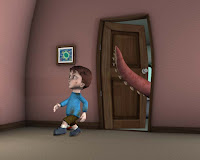
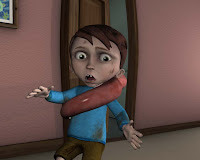
Final output will be 720x576, my textures vary from 6 to 14MB depending on the scale of the objects on screen. I have a few moving camera shots, I think the bump on the bathroom walls may cause some funky flickering, since it is the only element im using ambient occlusion on, I guess increasing the anti-aliasing will sort that.
More bathroom shots to come!

Monday 27 August 2007

Dan Biker/Dog combo

Hi All,

Just been mucking around with lighting and textures for a while so I thought I would put up a bit of a work on progress. The lighting is not final but I do think that I would like to keep it on the darker side..........for me it just seems to work for the character. All comments and crits would be much appreciated.

Cheers,

Dan

NB. Obviously, there is no dog in these images yet.........that is kind of my next step. I have also decided to sack off Final Gathering for this render as it is taking too long and the results are pretty average.


Saturday 25 August 2007

Ritchie-medusa

Thanks Alwyn, thats great! Have a good bank holiday weekend.

Friday 24 August 2007

Medusa


Hi Ritchie.

Your Medusa is looking awesome. I can see your problem, and I'm wondering if you can use zBrush? If you can, then you'll be able to do the texture, spec and displacement for your Medusa easily.
The other option is painting the seems out in bodypaint, which has some great tools for this type of thing. If you go down that road, I would look at laying the UVs out with 5-8 snakes in one UV space, paint your textures giving each snake the variation you want, then overlap the remaining snake UVs on top. You can move then around giving more variation in the overall appearance. After you've done that, you'll have to take it into Bodypaint or some other 3d paint package and paint out the seems.
Hope this helps.
C
a~

Thursday 23 August 2007

Ritchie - Medusa

Hello Alwyn! Thanks for agreeing to this blog its good of you, sorry I haven't posted sooner. Hope you can help, the snakes on this medusa project have been driving me mad!! I've run into numerous problems but the main one is the seams where the snakes join to the head. Could you give me some advice on how I can go about matching the Displacement/bump and colour at the joins. I was thinking of doing the map for one snake and copying it onto a 4k map accross 26 snakes then varying them slightly. However doing the same with the displacement or bump and making the seams align to the head is a bit tricky. I'm thinking of putting each snake in their own uv space and generating maps for each, then I will have to asign a separate cluster and material for each snake. If you have any advice on this as well as how you would approach creature texturing I would be very greatful! Thankyou.


Monday 13 August 2007

Hi Anna,

The thing that is going to make this work is definitely pushing that stylised look. I'm liking the warping in the geometry, the textures you've kept a fairly neutral colour with the exception of the two characters which is good, it's not too busy and your eyes gets drawn to the characters.
As for the wet look on the Octopus, I wouldn't be trying to get a 'realistic' wet look as such, what you're doing with the specular highlight is good, but I would bring the bump a bit, just to break up the highlights, and to get a feel that there is a texture underneath. If fact, looking at your renders I would bring the bump up on nearly everything, its all quit smooth.

For the cloth, find a piece of fabric or old cloth that has a fairly course texture and scan it. Use this to make a good bump (make it seamless) and really exaggerate this on your cloth...remember you're going for a stylized look, not realistic, so be bold with your detail.

What resolution is your final output?

C
a~

Alwyn's Profile

Hi guys,

I just wanted to give you some background information on myself and where I've come from.

I'm currently working at MPC as a Senior Texture Artist on 'Prince of Caspian', which is the follow on feature film to 'The Lion, the Witch and the Wardrobe'. I've been there since January, previous to that I was working in Toronto, on a CG feature called 'Everyone's Hero', a cute kids movie that was only released in North America. I spent two years in Canada.
Before that I was at Animal Logic in Australia working on commercials and other feature films, such as House of Flying Daggers, Harry Potter and Farscape to name just a few.

I enjoy traveling, surfing and having a good laugh.

I look forward to seeing more of your work as it comes through.

Cheers
Alwyn

Sunday 12 August 2007

Anna's texture updates

Hello

I am hoping to get a stylised look for both the environment and the characters. Been working on textures for the octapus and the room/ objects, had to stop myself from adding too much detail and avoiding to go towards realistic - it can be quite tempting in 3D!


Some screenshots:


Any suggestions for making the octapus look wet? I used a phong and put the specular decay to the maximum. Any tips on cloth?
Also, I wasn't sure what sizes and resolution of textures to use? For closeup and distant objects?

Thanks!

Anna

Wednesday 8 August 2007

Anna Stylianidou - Texturing for animated short

Hello everyone.

Thank you Alwyn for the opportunity to advice us, it is greatly appreciated!
My project is not focusing so much on modeling and texturing but i hope to create an interesting visual style that would push the animation and story.
To give you an idea of the story and pacing, this is my rough animation/block test so far - in boring lambert shaders and with camera headlight.


You can have a look at how the project has progressed and someof my previous work on my personal blog http://annamations.animationblogspot.com/


Some early texturing tests of the octopus and room, using watercolour textures:
Not really pleased with any of these, bit too intense. I may possibly keep the ink-outline on the lens if it suits the final look.

Re-evaluated colour concept:


Background colours and patterns are muted, the octopus stands out more and has a less fleshy colour.

Boy texturing development:

From Lambert boy to Baked AmbOc boy,

I used the Ambient Occlusion render maps by applying artistic filters in Photoshop to give that drawn feel - since painting them myself didnt look great.

(UVs unwrapped with the beautiful help of Roadkill)


I think its finally getting there! (hmm except the soles and laces that dont seem to show up with the texture i gave them..) Any feedback is greatly welcome!

Thanks


Anna

Tuesday 7 August 2007

Phil Pendlebury - Texture Tests

Hi, well today i spent my time getting into using zbrush/photoshop. These are a way for me to quickly asses which textures/colours materials ill be painted onto my final mesh, which im still constructing.


This first image has a number of different surfaces. Im considering the hard armour (bright green leafy stuff) that covers the pilot on her shoulders/arms legs/torso and parts of the helmet. Im also testing how i will do the root like cables that come from her helmet. I also need to work out what the more skin tight membrane will be like. Its a cool initial try, but im gonna have another go using a different set of colours and textures. This one is quite giger, due to the shine on the surface. But i want to keep it as matte as possible, more root/tree like then slimey alien.


Heheh ok this one above really didnt go to plan. I am modelling in some little energy packs near her kidneys, i want a bright gloworm inner orb/glow effect. I quite like the curve from the flat skin membrane onto the glow nodual thing....hmm, ill try again.


Right, here ive taken the canopy section of the vehicle and added some leafy textures, painted some patterns, im trying to suggest camoflage leaf insect but it seems alittle bright. Gonna tone everything down abit and make it abit more .... sinister, just alittle bit.


Im still finding more images to use as textures, and if the sun comes out im gonna go for a long walk and take some more photos of plants/leaves.

ill also start doing some tests on the actual geometry later this week. In the mean time ill do another set of these.

What do you guys think?


EDIT - Thursday 2am - Additional texture test! Ill add this in here instead of a new post:


Here i took a stage of the pilots armour, if you cant tell its the the main body minus the arms and legs and head (ill do a version with the entire armour set soon) ....played with it abit in zbrush, Sub dividing it loads, and sculpted into it. Then using Polypaint i created this texture over the top, directly on the mesh. Made it into a 2d image, took it into photoshop and played abit more with it. Im still working out colours/tones and shapes while i model things. Its a good way to do it i think, as i can anticipate where the darks and lights are going to land, and add less or more displacement on the mesh, also its nice to draw shapes out with colour and textures, then use it as reference or use the 'MRGB grab' tool in zbrush and make it an image texture itself to use again.

Ill add that ive still not done any uv's yet, as i want to really get the model right. Once ive done that ill be using Roadkill to smash my textures into flatness. then the real textureing begins -Evil Grin-

Phil.

Dan Moore Texture Intro!

Hi Alweyn,

Again, many thanks for taking the time out to advise us on all things textured.

My project this term is a "straight forward" human character which will be placed in a scene with my "Chopper Dog" model that i completed last term. The human is supposed to be an old biker mechanic who has created the "Choppper Dog" as both a means of self protection and for companionship.

At presant I am just finishing off the man's base mesh and will then be taking it into ZBrush to add in further wrinkles and skin details and then hope to use painted image to give the character his colour. To this end I have been collecting reference images of men in the character's age range and also I have have been watching a few ZBrush tutorials which deal with characters with leathery, wrinkly skin.

To give you some idea of the kind of skin texture I am after.


Previous work:

During the course I have been involved in a couple of projects in which I have been able to focus on the modelling and texturing aspects. In my group project, made with 2 others from my course, I did a large portion of the modelling and pretty much all of the texturing. The piece itself can be blow:


My last term major project was to model and texture a robotic dog made from bits of motorbike (or bits that looked a bit motorbike-ish anyway). Apologies if the music is a bit loud.


Prevoius to coming on the course I took a BA in Industrial Design and then worked for 3-4 years as a Creative Designer for the Retail Industry.

Some of my old work can be found on my very old and out of date website:

www.danmoore3d.com

and also on my blog which i am still trying to clear the back log of stuff that i haven't got around to posting:

http://workofdan.blogspot.com/

Anyway, many thanks once more.


Dan Moore

Monday 6 August 2007

Philip Pendlebury - Introduction

Hi Alwyn, thanks for giving up the time to give advice on texturing, its much appreciated.

thought id write a brief blurb about what im up to at the moment.


Ill try and keep it short!


I have an up to date Artblog which gives a good impression of where i am currently. The character design section contains a step by step breakdown of the current character workflow. Please check this out here

Also the root url is-> http://susurrusart.blogspot.com

i also have a number of posts on the Andrew Mcdonald modelling blog regarding my progress with the modelling for my Masters Project.

http://ma3dncca.blogspot.com/


This is my Illustration Degree website which was created about a year ago, its a snapshot of where i was.

www.philippendlebury.com


But to save you clicking on lots of links, and sifting through lots of different sites, ill give a overview below.


My goal for my masters project is produce both a HighPoly character and Vehicle design. I will
be presenting the character on its own, and then i will show the vehicle with the character posed and sitting within. When rpesenting the character, she will be full suited up, including a helmet/mask/rebreather over her face. on the vehicle she will be wearing alittle less, and have her helmet under her arm. This will be where we see her face.


Character concept. First: Shows one colour type and some material properties.

Texture wise, im on the verge of starting. But i still have some key elements of the armour modelling to complete. Im currently building a number of palletes / texture stamps to give you an impression of the colours and materials i will be using throughout the models. Im planning on using fast skin shader on her face, and bits of skin we see.. but am in need a of some advice regarding the best way to replicate human skin.

Semi-final base pilot model. Zbrush render with skin shader slapped on.


She is covered in Biotech armour, and has a Wingpack strapped to her back which has been genetically enginnered from dragonfly DNA. A top secret technology used in the fight against the serpents.


Equally her vehicle uses camoflauge technologies similar to that of leaf insects. A strong robust and extrememly manuverable ground based unit. It can rapidly change its outer surface to match its environments, but as the planet is largely covered in forests of varying types , this is
where its specialities reside.

Number of example of how i am basing the material and texture for the biotech surface. The dragon fly is for the wingpack and armour on the character, and the leaf insect is for the vehicle.


So we have Leaf/plant textures, Insectile textures, Human skin textures aaaand i think thats about it. I really want to stay away from anything metallic looking, man made is a big nono, and that goes with the colour pallete. Eventually when i get round to creating the 'Enemy' (sometime next year at this rate!), they will have the cold blooded, steel, man made, metallic textures, all strauight lines and oppressive. I want the good guys to have natural, warm earthly textures and colours.


More texture examples mainly for the natural elements on both the pilot and the vehicle. The leaf textures will be used for the wings which i want to suggest leaf like structures over actual insect wings. Ill try and do a merge between the two.

Ill leave it like that for this post. I will now finish off all the texture stamps/examples and post up.

just to add, I will be using Zbrush/Photoshop/Painter to create my textures.


Regards,

Phil Pendlebury